welcome


Welcome in my special space - get yourself a cuppa and stay for a while!!
Please leave a comment, that way I get to know you too...

Wednesday, 5 October 2011

picking up sticks with Blue Velvet Chair


This heart makes me want to run to the forest right now and start picking up sticks.


I love the idea...but have no idea how they were able to get the tops of these logs so even. I'd also be too tempted to throw them in the fireplace on a cold evening.
Pinterest


There's something a bit dark about this wall sculpture, but I like it!


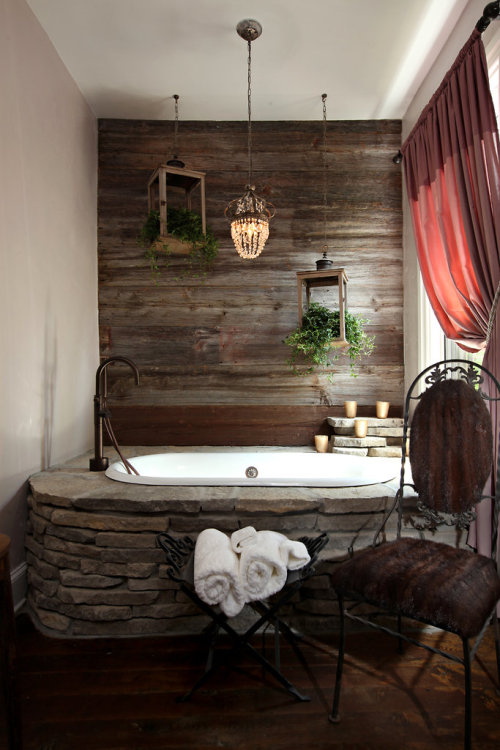
We're seeing more and more reclaimed wood walls out there. It's the perfect modern-day paneling for your home.


The list could go on and on, so we'll stop here today. As my husband always says (when we miss doing or seeing something), "It gives us something to come back for"!

See you again soon.

Until next time...
Mike

Cleaning Outdoor Cushions -http://beeinteriors.blogspot.com/


Nope. Not mine, but same look! My screened in porch is still a work in progress. You'll see it when it's DONE:)
via www://trends-on.info 


If you're like me, you've got outdoor cushions that go to your patio furniture, 
and they probably don't look exactly brand new anymore. One of the biggest
drawbacks to living in the south is our humidity.
It wrecks havoc on anything that can warp or grow mildew...ie. everything! 
So, you've go two options with patio furniture:
1. Don't use cushions,
2. Use cushions but only bring them out when you're actually sitting on them.

I'm not a fan of either option. My patio furniture gets used almost as 
much as my indoor furniture, so cushions are a must. 
But, I'm not going to put them up
 then pull them out all the time. Silly. So, what's a girl to do? 
Let them sit there and get filthy so that NO ONE wants to sit on them? 
Nope. Let's add an option three to the above:

3. Clean them regularly (annually or bi-annually- in my case)

The issue is this, mildew/mold doesn't come off with a garden hose 
(or a pressure washer for that matter). You can scrub till you're blue in the face,
 with no luck. That is...unless you use the right product! Oh, yea.
 My secret is about to come out. I'm sharing this little secret with you 
after "testing" it for years.
 It just works...plain and simple. My old neighbors used to see me regularly out
 with a scrub brush, garden house, patio furniture AND cushions on the driveway.
 It's not an easy task, doing it the old fashion way, but it works and last all season.

Here's the secret:
Ahhh....the secret weapon!

As you know, I'm not a fan of chemicals, but I'm also a realist and know that sometimes
that's just what you gotta use. When it comes to mold/mildew, 
you gotta pull out the big guns! 
Originally, I only used this on my white resin wicker patio furniture, 
then I got sick of the mold on my soft yellow cushions and decided 
they couldn't possibly look worse. 
What did I have to loose? Out it came and with a little experimenting,
 I figured out how to make them look brand new! Seriously!

Here's the method:
1. Soak the cushion or furniture down with water,
2. Spray liberally with Clorox Clean-Up,
3. Let it sit for about 5-10 minutes (not if you're in a dry environment..
only where it's humid),
4. If you have one of these:

Karcher Pressure Washer
the next step is really easy. Just spray it down real good with the pressure washer,
 turn on end and let dry. If you don't have a pressure washer, 
a good stiff scrub brush and garden hose will do.
 Just scrub every square inch down and then wash off. Again, stand on end and let dry.

See how easy that is? I even got up the nerve to try it on 
BLACK cushions with light color stripes that were beyond gross. Want to see?


I can't believe I'm showing you this! Disgusting!
There's a reason I went with black last time I bought cushions.
Another reason for mold issues is kids. We all love to eat out on the screened in
 porch and if you've spent five seconds with a kid eating, you know SOMETHING will end up on the seat!

O.k. ready for the after?

Oh, be still my heart!
It didn't even fade the black! It's like Clorox 2 for colors...really makes them pop more 
(then again, maybe just removing dirt does that!). Just for fun, let's see that again...side by side.

"Why, helllllooo! Didn't recognize you all cleaned up! Want to stay awhile? Have a seat!"

Amazing what a little bleach can do!

more Pallet re purpose from Blue Velvet Chair...


The Blue Velvet Chair


Posted: 31 Aug 2011 01:31 PM PDT
There have been some jaw-dropping wooden pallet projects this past year and each one I find seems to up the anty over the last. However, there have been as many concerns raised about using these wood remnants for fear of chemical treatments and bacteria.

Not only has Donna over at Funky junk been at the forefront of some great pallet DIY projects, she is also providing solid information about what to look for and consider when working with pallet wood.

Hop over to Funky Junk and pick up some good ol' fashioned inspiration for pallet creations. Her latest is an outdoor sofa just the right size for her and her son.


And you'll find LOTS more DIY pallet inspiration on this Pinterest Board. For little-to-nothing cost, you can't beat the price of DIY wood pallet projects!

Until next time...
Mike


finds i love at Blue Velvet Chair....


Posted: 14 Sep 2011 07:11 AM PDT
Sometimes it pays off to go back into the archives. That's where I found this DIY log pedestal cake stand from LaLa Laurie via OnceWed.


Do you have an upcoming party that requires rustic decor? Maybe you can find more inspiration here on Google images for Rustic Party Decorations.

Until next time...
Mike
http://bluevelvetchair.blogspot.com/

Stumble this post
Posted: 13 Sep 2011 03:29 PM PDT
Isn't this just the perfect little table lantern for an engagement party or wedding reception?


If you haven't run across Notonthehighstreet.com yet, you should definitely take a few minutes to have a peek. This online marketplace for handmade arts and crafts is a powerhouse in England. These cute little lanterns come to us from This is Pretty.

Until next time...
Mike
http://bluevelvetchair.blogspot.com/

Stumble this post

And from .....http://ilovepom-poms.squarespace.com/ a must visit!!


is bigger better?

Or is bigger quicker?
I'm experimenting with a prototype of a 15mm crochet hook...

a great crochet find....


Craftzine.com blog - 3 new articles

In This Issue...


Fabric And Crochet Blanket

crochet_fabric_blanket.jpg
fabric_crochet_blanket_stitch.jpg
Heidi of Sewing Daisies created this really cool and interesting throw blanket by combining sewn fabric squares and crochet binding. It's kind of like what I imagine what would happen if a quilt and an afghan had a baby together. Read more about how it came together over on her blog. [via Kerri Horsley on Pinterest]


CRAFT Flickr Pool Weekly Roundup

Here are some cool things we saw in the CRAFT Flickr Pool this week:
meekssandygirl_crochet_necklace.jpgFall Harvest Bib Necklace in Crochet, by meekssandygirl

Saturday, 1 October 2011

http://thisdomesticlife.blogspot.com/ posted this- what a great find


Work in Progress: My First Crocheted Rag Rug


My first crocheted rag rug.
My kitchen rug died. The rubber backing crumbled to bits and skuzzied up my wash machine. I hate when that happens.

I went to the store to replace it but they wanted $55.  Forget that.

I've been seeing some gorgeous crocheted rag rugs on the Internet. Some of them are works of pure folk art and make my heart go pitter patter.

I thought I might give it a try. This is, after all, a great stash busting opportunity.


IMG_8332
So I gathered my fabric stash and started turning my fat quarters into strips to make "yarn."


IMG_8334

In the beginning my little rug looked like vomit. I was getting discouraged but I kept adding color.

No fancy shapes, here. This is just a circle.

Start with a magic ring with 6 stitches.
Working in the back loops only:
Row 2: 2 sc in each stitch (12 sc)
Row 3: 1 sc in next stitch, 2 sc in next (18 sc)
Row 4: 1 sc in the next 2 sts, 2 sc, around (24)
Row 5: 1 sc in the next 3 sts, 2 sc, around (30)
Row 6: 1 sc in the next 4 sts, 2 sc, around (36)
Row 7: 1 sc in the next 5 sts, 2 sc, around (42)


and so forth. Increasing by six sts in each new row.


Rag rug:
The size of a large pizza.

No one tells you this, so I will. Working with fabric "yarn" is tough work at first. It's chunky and clunky and awkward. Since I crochet tight by nature, I am probably half the problem.

But the results are worth it. I live playing with colors and this is just the project I need.

Even Mr. Awesome is interested in this project which is odd.

I am out of fabric so I am off to the store to get some more. Don't you just hate having to go to the craft store? Hahahaha.
Add starShareShare with noteKeep unread