CAL :: Learn half double crochet and double crochet, increasing and decreasing
by Rachel
Crochet lesson #2, coming right up! How are we doing so far? Are things making sense? On Monday, we covered the chain stitch and single crochet, and we're moving along today to the next two basic stitches, the half double crochet and double crochet, and a quickie lesson on increasing and decreasing your stitches.
(As a side note, the same stitches go by different terms in the US than they do in the UK, just to make things a little more confusing for you. I'll be using American terminology today and, well, every time I ever talk about crochet. If you're already familiar with or think you'll encounter British terminology more, you can reference this handy little chart for a translation.)
If you're feeling pretty comfortable with the single crochet from our last lesson (click here if you need a review), you should be able to pick up these new stitches pretty easily, since they're just a variation on the single crochet stitch!
As usual, please feel free to ask any questions you run into as you work--either leave them in the comments (I'll come back and answer them in the comments, so check back for a response!), or email me, and if you still haven't signed up for the crochet along, do so right here!
Half Double Crochet
I mentioned in our last crochet lesson that it's necessary to make a chain at the end of each row in order to be "tall enough," so to speak, to work into the previous row. A single crochet is a rather short stitch (it feels weird to be talking about crochet in terms of height, but I can't think of a better way to put it), so you only need a chain of one to be tall enough to make more single crochets. A half double crochet is taller than a single (and a double, as I'm sure you can imagine, is even taller still!), so we need a chain of 2 at the end of a row instead of just a chain of 1 in order to be tall enough to make half double crochet stitches. I'll be working on the same practice piece I made for the last post; if you prefer, you can make a new chain and start from scratch--if so, just make a chain and work your first half double crochet stitch into the third chain from the hook instead of the second, as you did with single crochets.
Start by making two chain stitches, and turn your work so your single crochet stitches are on the left and the little chain of two on the right:

(Do the pictures look different this time around? I apologize if they're awful, but my husband has been so busy this week and I had to take these myself. I'm blaming any picture deficiencies on the difficulty of trying to crochet and pose with just one hand, and using the other hand to hold the camera.)
Yarn over before inserting your hook anywhere (I find it helpful to place the index finger of my right hand on top of this yarn over to hold it in place for the next step):

Now insert your hook under both loops of the first stitch, then yarn over again:

Pull this yarn-over loop through the stitch of the previous row, just as you did when making a single crochet (you should now have three loops on your hook):

Yarn over again:

Pull this yarn-over loop through all three loops on your hook:

Done! That's all it takes to make a half double crochet stitch. (If you care for further enlightenment, here's a videodemonstrating the half double crochet, and here are some more pictures, in which the half double crochet is heartlessly called "an oddball stitch," which sort of makes me feel sad for it. Poor little half double crochet.) It's essentially the same as a single crochet stitch, with the addition of a yarn over at the start. Continue working half double crochets through the end of this row, then chain 2 and turn to keep practicing on the next row. You can see in this picture the difference in height and appearance between the single crochet stitches at the bottom of my little rectangle as compared to the taller, sort of twisty-looking half double crochet stitches nearer to the top:

Once you've practiced and feel comfortable with the half double crochet, move along to the double!
Double Crochet
I don't mean to get all sentimental on you, but I think the double crochet might be my favorite stitch. I also don't mean to get all dorky on you, but I think I may have just taken crochet nerdiness to an entirely new realm in admitting to having a favorite stitch.
Again, we'll have to make a chain greater than just one stitch at the end of our previous row to be tall enough to work double crochets. Some patterns recommend chaining two, and some recommend chaining three when you're going to be working double crochets. Personally, I feel a chain of two is sufficient, but feel free to try both and see if you have a preference! (Or just mindlessly do what the pattern tells you to do, once you get to that point. Surely they know what they're talking about.)
So, if you haven't already, chain 2 (or 3) at the end of your previous row and turn your work so the stitches are on the left and the chain is on the right, then yarn over (again, I couldn't show you this since I was the one taking these pictures, but I like to pinch down that yarn-over loop with the index finger of my right hand to hold it still while I go on to the next step):

Insert your hook into the first stitch of the previous row and yarn over again:
Pull your yarn over loop through; you should now have three loops on your hook (so far, this has been just like the half double crochet, but it's about to get different):
Yarn over again:
Pull this yarn-over loop through only the first two loops on your hook--this should leave two loops on your hook: the one that you just pulled through (your yarn over), and the one loop that you didn't pull your yarn through, left over from earlier (I find it helpful when pulling the yarn-over through just 2 of the loops to place my index finger on the third loop to hold it down and keep it separate from the others--that way you won't accidentally get overexcited and just do a half double crochet by pulling through all three). So remember, with a half double, you pulled the yarn-over through all three loops; with a double, you're just pulling it through two of the three loops (double = two . . . might there be a method behind the madness of naming crochet stitches? I don't know. I just. don't. know.) This is what your work should look like at this point--you'll now have two loopsremaining on the hook:

Yarn over again:

And pull your yarn-over through both of the remaining loops on your hook:

Bam! Double crocheted! (For your viewing pleasure: here's a double crochet video, and some more pictures.) Here's another handy dandy comparison for you--the double crochet stitches at the top are the tallest (and, might I add, noblest), the half doubles are medium-tall and have a cute sort of twistiness to them, and the singles are bringing up the rear with a simple, compact, almost starry look. Isn't it pretty?

There is also a triple (also absurdly called the treble) crochet stitch that I didn't take my own pictures for because, seriously, you'll almost never use it. I think I've only ever seen it in a pattern a handful of times, so I'll just send you elsewhere if you'd like to learn it, too: here's a video, and here are some pictures. It's good to have in your arsenal, but you probably won't be whipping that one out very often.
Increasing and Decreasing
I'm going to give you a quick little mini-class on increasing and decreasing--I won't go into too much depth because, well, this was the point that Jeff got home and offered to take pictures for me, but he was doing a rather horrid job (poor man; artistry and creativeness are not his strongest points) so I rushed through and probably didn't get enough pictures to really do it justice, so if you're interested, you can find a more comprehensive lesson from Lion Brand Yarn here.
So far we've made a pretty little rectangle . . . but what do you do if you need your work to grow wider? Or smaller? This is where increasing and decreasing come in--you'll definitely use these skills if you start making hats (or anything circular, really) or clothing. I'll demonstrate this in the pictures with double crochet, but the same principles apply no matter what stitch you're using.
To increase in double crochet, you'll work one double crochet as normal:

Then, instead of moving on to the next stitch for your next double crochet, you'll make another double crochet in the same stitch as the first:

Do you see? There are now two double crochet stitches worked into the same opening (the turning chain is just to the right). I worked an increase into the first and last stitches of the row:

And you can see that after two rows of increasing in the first and last stitches, my work is growing!

To decrease, you'll essentially do the opposite--you'll combine two stitches into one. You begin your stitch as normal, but stop just before the last step--stop before pulling the final loop through:

Then begin your stitch in the next space, and stop before finishing it, too:

Now complete your stitch, pulling the loop through all the loops on your hook:

This basically combines the two stitches into one! After two rows of decreasing the first and last stitches, my work looked like this:

First it grew with my increases, then it shrank again with my decreases. A pattern will always tell you when you need to increase or decrease, so you don't have to worry too much about getting it down pat right now, or knowing when to do it . . . your pattern will let you know.
I'll meet you here Friday for a lesson on deciphering crochet patterns, and we'll start our cowls on Monday!
Don't forget to take a moment to visit our Crochet Along sponsors!


Add star
Sep 12, 2011 9:46 AM
CAL :: Learn to chain, single crochet, and turn your work
by Rachel
(If you still haven't signed up for the crochet along, hop over to this post and add your name to the list of participants! Also, if you have any questions at all along the way, leave them in the comments or write to me at maybematildaquilts [at] gmail.com--I'll do my best to answer them!)
Today is our first stitch lesson for the crochet along! I'll admit, I've been a little nervous about the teaching part of this crochet along--I've admitted before that I don't think I'm a very good teacher, but here's hoping that it's a little easier online, with pictures and text that I can plan out ahead of time, than it is in person, where I fumble through nonsensical explanations and always resort to, "No, do it like this . . . like this! Thiiiiiiiiiis!"
So here's the plan: I'm going to give you my own explanations with pictures, but include plenty of links to other great resources that will probably be much more helpful than what I have to offer. I think videos will be the most useful (watching someone actually do crochet is a completely different learning experience than looking at pictures of crochet), but I'm far too awkward and embarrassed to make my own video (seriously, I don't think you should be subjected to that), so I'll include some good ones for you.
For practicing, I would suggest using a worsted weight yarn that you don't particularly care about--save your project yarn for the cowl itself. Of course, if you only have project yarn, that's fine--you can always just pull your stitches out when you're done practicing, and reuse your yarn on the cowl. I would suggest using a hook somewhere in the F through I range to practice with (if you're practicing on worsted weight yarn). In these pictures, I'm working with scrap worsted weight yarn and an H hook.
Before You Start
Probably the trickiest part of learning to crochet (for me, at least) is working on your tension--you need to be able to hold the hook, work your stitches, and hold your yarn in such a way that your stitches come out nice and even. It can feel very awkward at first to try and hold everything in place, not to mention adding stitches to the mix! And if you pull the yarn too tightly, it'll be practically impossible to crochet more than one or two rows before you can't even work your hook through the stitches because they're so tight; hold it too loosely, and you'll end up with gaps and holes and goofy loops in your work. (Although I'm actually left-handed, I crochet right-handed, so that's what the pictures will show. If you plan to crochet left-handed, you'll need to reverse what you see in the pictures.)
Here's what works for me: I loop the yarn around my pinky finger of my left hand, then drape it over my pointer finger, like so, and hold the hook in my right hand (there are a few different ways to hold everything; just do what feels the most natural to you--here's a link that demonstrates some different ways to hold the hook and yarn):

View from the top:

Do whatever works for you--wrapping it around my pinky finger helps me keep the yarn running smoothly into my project and dispensing from the skein at an even rate. If it feels awkward or uncomfortable to you, or if your stitches seem huge and loose or way too snug, try something else! Here's a video from Crochet Geekdemonstrating another way to hold your yarn and control tension, and another video that shows how to deliberately tighten or loosen your tension, and how tension can affect the look and size of your finished work. Whether your stitches are loose or tight or somewhere in between, the most important thing is consistency . . . if they're tight and that works for you, great! If they're loosey goosey and you like it that way, fantastic! The main thing you should focus on right now is that they're all loose or all tight, so your finished work looks even and consistent. One isn't necessarily better or worse than the other, but your work will look silly if you switch back and forth between the two.
Chain Stitch
A chain creates the foundation of just about every crochet project. Luckily, it's not very hard to do, and you'll be a pro at it in no time! Start by tying a slip knot around your hook (here's a video demonstrating the slip knot if you'd like to see it in action . . . plus the music had me kind of head-bobbing in my seat; further proof that I should never make videos):

Now, wrap the yarn around your hook from the back to the front (make sure you're working with the yarn connected to the ball and not the tail end dangling from the slip knot. . . I've made that mistake before!), and grab it with the end of your hook (this is called a yarn over, and you'll continue using it to make your stitches):

Pull this loop that you just grabbed down through the loop that's already on your hook (I find it helpful to hold the slip knot steady with my left hand as I pull the loop through):

You've just made one chain!

Now keep going--grab a loop of the working yarn and pull it through the loop on your hook. If you'd like to see an action version, here's a video from Lion Brand Yarn showing the chain stitch.
For demonstration purposes, I'm going to work with a chain of 11--count each chain you make until you hit 11, and you should have something that looks like this (when counting your chains, don't count the slip knot at the start, or the loop currently on your hook--just count the finished chains between the knot and the loop on your hook):

Are you a pro at chaining now? Excellent! Let's move on to the single crochet.
Single Crochet
We made our chain from left to right--now we work our first row of single crochet back across from right to left (other than when you're making a chain, you'll always crochet from right to left).
Do you see how your chain looks like a row of little Vs? Usually, unless the pattern specifically tells you otherwise, you'll make your stitches by inserting your hook under BOTH parts of the V, called the front loop and back loop.
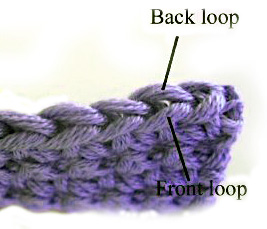
But when you're making that first row of stitches on top of your chain, it's just too difficult to try to get your hook under both loops. So for this first row, you can just insert your hook under the back loop only of your chain stitches.
So, insert your hook under the back loop of the 2nd chain away from your hook (or, if you're counting in from the left, the 10th chain out of 11), the one marked with a needle in this picture:

Yarn over, as you did when making a chain:

And pull that loop through the back loop of the chain (you'll now have 2 loops on your hook--the one that was already there before you started your stitch, and the loop you just pulled through) (side note: when pulling your yarn through a loop, it's easiest to turn your hook so it's facing down--since I've already pulled it through in this photo, my hook is facing up again, but scroll down to the next picture to see how I hold the hook when pulling yarn through a loop. As you crochet, your hook will constantly be rotating up to yarn over, and down to pull them through; you'll get the hang of it with practice!):

Yarn over again:

And pull it through both of the loops on your hook:

That's a single crochet!
Here's another video from Lion Brand Yarn demonstrating the single crochet, and another from Crochet Geek--it will probably make more sense as you watch someone do it, versus just looking at picture, so hop over and watch the videos while you try it yourself!
Now keep going--work a single crochet into the back loop of the next chain (the one marked with the needle):

And keep single crocheting down the row. When you reach the end of the row, you should have 10 single crochets:

Turning Your Work
Maybe you noticed that we started with 11 chains but only ended up with 10 single crochet stitches (you're so astute!). Since our rows of crochet build up on top of each other, we have to use chains at the end of each row as a sort of ladder to get up high enough to work on top of the previous row. When you reach the end of a row, you'll turn your crochet work so you can go across from right to left again, but you'll be starting at the base of your previous row. So you'll need to create a turning chain to bring you up to the height of the stitches you'll be making.That one extra chain when you began became a little mini-ladder to make you tall enough to work into the stitches for your single crochets.
So, at the end of your row of 10 single crochets, make one chain:

And turn your work (here's a handy little illustration showing you how to turn)--just rotate it around, so you'll now have your ten stitches on the left, and your little chain on the right. The chain gives you some height so you can work your first single crochet into the first stitch of this row. You'll insert your hook into this first space here, marked by the arrow:

If it makes more sense to look at it from this direction, here's the view looking down at the top of your work. The teensy little V on the right is the chain, and you'll insert your hook under both loops of the first stitch, marked by the needle (again, unless a pattern specifically tells you to just work in the front or back loop, and unless you're working into the chain, you'll insert your hook beneath both loops):

Here's what my piece looked like after working my first single crochet in the second row:

Keep on going--single crochet in each stitch across the top of the row, and count as you go--you'll have ten stitches again. Make one chain at the end, turn your work, and continue into the next row. After a few rows of practice, you'll have a little rectangle or square made of single crochet stitches!

Don't worry if they don't look all neat and perfect--that's why we're practicing.
Once you have the single crochet down pat, learning the other stitches will be so much easier--all your basic stitches are just a variation on the single crochet, so keep practicing it and the others will come easily! Remember to be patient with yourself, and hit me with any questions!
No comments:
Post a Comment