welcome


Welcome in my special space - get yourself a cuppa and stay for a while!!
Please leave a comment, that way I get to know you too...

Monday, 15 October 2012

from miss mustard seed.....pay them a visit

shortcut to hemming curtains


Posted: 13 Oct 2012 04:44 PM PDT


When I was a newlywed, I traded my mom my rollerblades for her sewing machine. I wanted to learn to sew and make things for my house. And she wanted to…well…rollerblade. I don’t know if she ever took up rollerblading around the neighborhood, but it was a great trade for me. Today, I helped her [...] read more

must visit blogs.......

Shades Of Amber Chalk Paint Party


A Bowl Full of Lemons

DIY By Design

Trash 2 Treasures at Kammy’s Korner

Project Queen

Tip Junkie

My Uncommon Slice Of Suburbia

Elizabeth & Co.

Not Just A Housewife

Coastal Charm: Nifty Thrifty Tuesday

House of Grace – Twice Owned Tuesday

A Stroll Through Life


Embracing Change

Fireflies and Jellybeans

Primitive and Proper

Wow Us Wednesdays at Savvy Southern Style

Restore Interiors

domestically speaking: power of paint party


From My Front Porch To Yours

The Brambleberry Cottage

No Minimalist Here – Open House Party

My Repurposed Life

beyond the picket fence

Transformation Thursday at The Shabby Creek Cottage

house of hepworths

36th avenue


Serenity Now

Inspiration Friday At The Picket Fence

Miss Mustard Seed

Remodelaholic

Feathered Nest Friday at French Country Cottage

Tater Tots and Jello


Funky Junk Interiors

The DIY Showoff

Be Different Act Normal


Sisters of the Wild West – Sister Sunday Link Party

Nifty Thrifty Things

Under The Table And Dreaming

Friday, 12 October 2012

Moving on

Moving on


"You must make a decision that you are going to move on. It wont happen automatically. You will have to rise up and say, 'I don't care how hard this is, I don't care how disappointed I am, I'm not going to let this get the best of me. I'm moving on with my life."


- Joel Osteen -

Wednesday, 10 October 2012

from crafty stuff...a find!!!


For crafting paper, ribbons, buttons, embellishments , gifts Brown paper bags, a scrapping edge-punch and a tag, maybe somne candy canes..or pretty fabric flowers


and more : www.craftystuff.co.za

Sunday, 24 June 2012

lovely post from http://whiteironstonecottage.blogspot.com/ one of my personal favorite blogs worth a visit

Posted: 21 Jun 2012 09:59 PM PDT
 Hi Everyone
 Happy Thursday
We have friends
  staying in our guest cottage
Even though it is small it is filled with
{Love}
The extra large comfy sofa bed
is popular during the summer months with friends and family
 We try to make our guests feel Welcome
By adding the
 little things such as fresh flowers
  candles, lots of pillows and a few books and magazines to read
we hope to make the cottage feel like
 a home away from home
A simple metal cabinet holds extra blankets
  a bar of soap, a few towels and
bottles of water
The great thing about the cottage is
 even though it is near the house 
it is very private
A special cottage for wonderful guests
speaking of feeling special
I am so grateful to all of you
 who entered the 
vintage tin heart giveaway
I enjoyed reading all of your sweet comments and meeting new friends too
 The winner is
Kathy from
 Creative Home Expressions 


I will be selling  the tin  hearts in my online shop
 they are $45 dollars
  each one is one of a kind custom made

 Thank You all again for entering the giveaway
 I truly
 

 you all


romantic saying for today
"Home is where ever I am with you"
unknown

Friday, 22 June 2012

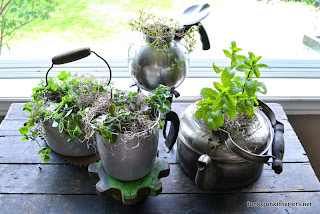
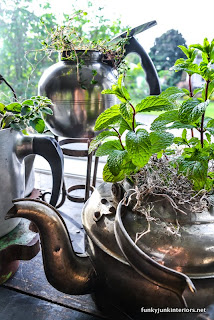
A old kettle ...A herb garden Great find...from Funky Junk


Posted: 20 Jun 2012 11:56 PM PDT
herb garden planted in old kettles via Funky Junk Interiors
Growing a small herb garden has intrigued me for awhile. So last time I picked up a few plants for the garden, a few fragrant herbs made their way into my basket as well.

Where to put them? Didn't have a clue.
empty old kettles

I just dug around in my junk storage stash and came up with 4 kettle styled containers and thought... hmmm... I like!
herb garden planted in old kettles via Funky Junk Interiors

Nothing complicated about this project. Some potting soil was all that was added.

spanish moss in plants

Ok, not quite true. A little spanish moss was added to hide the soil. I just like this stuff. It's got such a great texture.

cog gear green

rusty gears cogs

No project would be complete without a few rusty gears! Truth be told, they helped to elevate some of the kettles for added height interest.
old kettle


herb garden planted in old kettles via Funky Junk Interiors

My favourite herb is spearmint. I remember while growing up, we had a wild bush of it growing inside our old farmhouse garage. A quick little pinch would have me dreaming of gum. :)

There's also two types of thyme that remind me of homemade soup!

I don't remember what the fourth is, but it's all good. I may eventually cook with some of the herbs handy right next to the kitchen, but for the most part, as with most everything else I create...

herb garden planted in old kettles via Funky Junk Interiors

I just like looking at them. :)

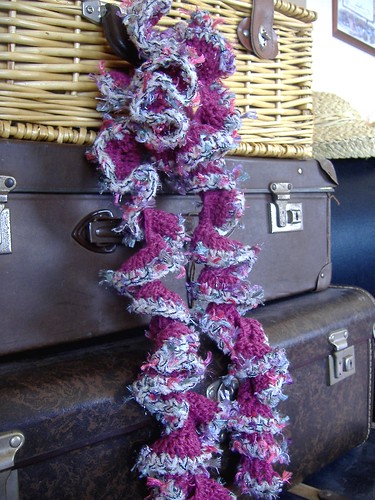
a scarf pattern free from laughing purplegoldfish designs A MUST visit

3-2-1 and you're done! it's a curlicue scarf

Curlicues are so simple, and so fun...

pink curlicue scarf

This is my 3-2-1 Curlicue Scarf, and if you can remember the name - you can remember the pattern.

work a row of loose chain as long as you want the scarf to be

row 1 - work 3 dc into each chain

row 2 - work 2 dc into each stitch

row 3 - work 1 sc into each stitch

it's as easy as that 3-2-1 and you're done!
I used a 6.0mm hook and 8ply/DK yarn. Then I used a novelty yarn for row 3 to provide some contrast. Experiment with whatever yarn you like!

a great find in a cold SA...keep warm crocheters

Hydrate in Style With a Crocheted Water Bottle Cover  from about.com crochet


Crocheted Water Bottle Cover - Photo © Erica Jackofsky

Want to keep your water bottle chilled without your hands suffering the same fate? If so, perhaps you'll appreciate this crocheted water bottle cozy. I hope you'll enjoy this project; it's interesting to crochet, plus it's a quick project made using affordable yarns. The free pattern is by Erica Jackofsky.

Related Resources:

• Check out more free crochet cozy patterns

• Discover more free crochet patterns for a variety of different projects

See More About: cozies beverage cozies crochet patterns by erica jackofsky

From Amy Solovay, your Guide to Crochet

Saturday, 26 May 2012

from about.com a crochet find free pattern included

Granny Square Crochet Tote Bag Pattern
Granny Square Crochet Tote Bag
Photo © Lori Jean Karluk
A variation of the Aster Granny Square makes this tote the perfect fashion accessory. Feel free to use any colors of your choice.
Skill Level: Intermediate

Materials Used in This Example:

Worsted weight yarn. I used Red Heart Classic yarn colors: about 3 oz. pale sage No. 622 (A), about 2 oz. white No. 001 (B), bronze No. 286 (C), copper No. 289 (D) cardinal No. 917 (E) and dark sage No. 633 (F). You can also use a similar yarn in the colors of your choice.
11 inch by 20 inch piece of fabric in color of your choice for lining. I used a light green shaded fabric to match the pale shade yarn used.
sewing thread to match fabric
sewing needle
tapestry needle for weaving in yarn ends, sewing and embroidery
US Size I hook
Finished Size: 11 inches by 12 inches excluding strap
Gauge: 8 dc = 2 inches; 3 dc rows = 2 inches

Abbreviations:


ch = chain
ea = each
sl st = slip stitch
sc = single crochet
hdc = half double crochet
dc = double crochet

Special Stitches:

Back loop only - Instructions link, with photos: front and back loop how to
See also: loops in crochet

Directions:

Tote

Aster Granny Square:

Make 2 granny squares using color A and the granny square instructions from the aster granny square pattern.

Fabric Liner:

Place one piece on a piece of paper. Trace around it to make a paper pattern as a guideline for cutting out fabric liner shape allowing a little extra around edges for seam. Cut two liner pieces from fabric. With right sides together, sew around three sides leaving top open. Fold top edge of liner under ¼ inch to wrong side, and then fold under again. Sew along folded edge to hold edge in place. Set aside for later.

Assembly:

Holding two crocheted pieces together, matching stitches, join color B to corner stitch. Working sc through both pieces (to join the squares), sc in each st around three sides working 3 sc in each bottom corner stitches. Leave top open. Do not fasten off, turn.
Trim: See a close-up photo of the trim.
You will be working the chains in a sort of zigzag pattern while doing the trim.
* ch 11, sk next 5 sc, sc in next sc, ch 11 (you will be working in sc sts you just skipped from left to right), sc in first skipped sc, ch 11 (you will also be working in remaining sc sts in row from right to left), sc in next sc, ch 11, sc in next skipped sc (working from left to right), ch 11, sc in next sc (working right to left); repeat from * across 3 sides of tote leaving top open. Do not fasten off. Continue to sc evenly around top opening of tote. Fasten off. Weave ends in.
Insert the fabric liner into the tote. Hand sew top edge of liner to the inside of the tote in such a manner that the stitching will not show from the right side of the tote.

Aster:

To begin: With color C, ch 2.
Round 1: 6 sc in 2nd ch from hook.
Round 2: * sc in next sc, 2 sc in next sc; repeat from * around (9 sc).
Round 3: change to color D, * sc in ea of next 2 sc, 2 sc in next sc; repeat from * around (12 sc).
You will now work on the petals of the aster.
Round 4: change to color E, * ch 13, sc in 2nd ch from hook, sc in next ch, hdc in ea of next 2 chs, dc in ea of next 6 chs, hdc in next ch, sc in next ch; sc in back loop of next sc of round 3, ch 11, sc in 2nd ch from hook, hdc in ea of next 3 chs, dc in ea of next 4 chs, hdc in next ch, sc in next ch, sc in back loop of next sc or round 3; repeat from * 5 times.
You were working in the back loops of round 3 for the back petals. Now you will work the front petals in the front loops of round 3.
Round 5: * ch 6, sc in 2nd ch from hook, sc in next ch, hdc in ea of next 2 chs, sc in next ch, sl st in front loop of Round 3, repeat from * 11 times. Fasten off leaving 12” yarn tail for sewing the aster to the square. Thread tapestry needle with yarn tail. Sew aster to center of square by stitching through round 5 at base of petals. Fasten off. Weave end in.

Finishing:

Thread the tapestry needle with a 15 inch single strand of yarn in color indicated in photo. Embroider bud details in straight stitches and french knots in colors C, E, and F.

Tote Bag Strap:

With color B, ch 81.
Row 1: sc in 2nd ch from hook, sc in each ch across, turn.
Row 2: ch 2, hdc in each sc across, turn.
Row 3: ch 1, sc in each hdc across. Fasten off leaving 8 inch yarn tail.
With tapestry needle and yarn tail, sew end to inside of tote at top of one seam. With 8 inches of color B, sew opposite end of strap to opposite side of tote at inside top at seam. (refer to the photo to see where the strap ends are sewn to the tote).

I found mine in Parys Freestate SA (hometown)

Posted: 23 May 2012 12:50 PM PDT
Hi Everyone
 Happy Wednesday
Shopping for vintage treasures is so much fun
{Love}
 to travel to
 Brimfield
 I did not get to go this year and I heard it
it rained quite a bit
and Round Top
one of the BEST places to hunt for treasures 
there is always so much to see
But sometimes it is fun to look for treasures 
right here at home too
I have to admit I have found some of my favorite things
 at the strangest places
 including the side of the road 
This beautiful sheet of vintage tin was a recent find
Found it for $5 dollars
at a Thrift shop
I was dropping off donations and just had to go take a peek
The people  running the shop were going to throw it away
 they were upset there was so much rust
I offered to buy it 
I saw them shaking their heads as I walked out of the store
They even asked me what I was going to do with it
There were so many visions in my head
  it would make beautiful frames, even little cut out hearts
when we got home  I sat it by the entry table
 and you guessed it....
Just look how  pretty it looks
 its been there ever since
What would you do with this sheet of tin?
Rusty vintage charm
with the most fabulous flower design and
it was already white and wonderful

Shopping for vintage is a treasure hunt
it is always fun to see what treasures you will find
linking for White Wednesday


romantic saying for today
"Give all to Love Obey thy heart"
Ralph Waldo Emerson

Pam

TOP 10 AKA DESIGN DIY PROJECTS what a find

Posted: 18 May 2012 04:01 AM PDT
All right all you Canucks, this weekend is May 2-4! That means it’s time for DIY projects, gardens, highway traffic jams and the real beginning of summer! And for our American neighbours south of the border, I know that next weekend is your May long weekend. So the same goes for you I suppose!
Typically on Fridays we post five random things from our week. This time we’re going to go a little less random and give you TEN of our top DIY projects that you could tackle in a weekend! So get out your saws, sanders and paint brushes, this is going to be fun!
five 
*****
*****
diy restoration hardware inspired shelves
*****
*****
*****
*****
*****
*****
*****
*****
So there you have it – the TOP 10 AKA DESIGN DIY PROJECTS

Wednesday, 16 May 2012

Art of Crochet by Teresa - Free Instructions and Patterns

Posted: 15 May 2012 03:21 PM PDT


Crochet Butterfly Fiona


How to make a crochet Butterfly

If you are a beginner, you can find a playlist for the basic crochet stitches by clicking on this link.  Beginner Crochet Stitches


Crochet Geek YouTube - http://www.youtube.com/tjw1963


Crochet Geek 2 YouTube - http://www.youtube.com/crochet

Written by Teresa Richardson

Video Tutorial: Crochet Butterfly Fiona


Video Tutorial: Crochet Butterfly Fiona Left Hand Version

Skill Level
 - Intermediate

Abbreviations

DC - Double Crochet

SL ST - Slip Stitch
SC - Single Crochet


Materials
Size I/5.5 mm crochet hook
4 ply yarn
Tapestry Needle

Optional: Chenille Wire stem for butterfly body
Optional: Magnet


Chain 5, join


Round 1: Chain 1 (won't count as a stitch), *2 DC through the chain, Chain 3, continue around from * 8 times total. Join with the beginning stitch. ( 8 sets of 2 DC, CH 3)


Round 2:  Work a slip stitch between the double crochet.  Work a chain 1, *SC between the DC. Working in the next chain 3 space, work 4 DC, CH 3, SL ST to DC, 4 DC in same space. Complete from * a total of 8 times.  Join with the beginning stitch.  ( 8 sets of 4 DC, CH 3 join, 4 DC, SC between DC)


Upon completion, you will fold and align the double crochet together so there are 4 sections on each side.  Sew together so they stay in place. Knot secure and sew in the tails.


Chenille Stem:  Approximately 8 inches.  Align around the butterfly.  Twist at the top and shape antenna. 


Magnet: Glue a magnet to the back for using on a refrigerator or magnetic board.