I share..... in this space links, ideas and tutorials with you on a daily basis
welcome
Welcome in my special space - get yourself a cuppa and stay for a while!!
Please leave a comment, that way I get to know you too...
Saturday, 28 April 2012
Friday, 27 April 2012
make it a daily visit...great site great buys....www.craftystuff.co.za
Learn to Crochet for Beginners.. a little inspiration
A Few People have asked me about learning to crochet.
Its quite simple, once you have mastered a few of the basic steps. There are loads of sites that have already published tutorials, so I am going to give you the links to a couple of the ones that I think are worth a visit.

Its quite simple, once you have mastered a few of the basic steps. There are loads of sites that have already published tutorials, so I am going to give you the links to a couple of the ones that I think are worth a visit.
First take a look at my Pinterest board. Lots of gorgeous crochet that other people have done. Who says crochet has to be granny doilies !! a lot of the pics have free patterns with them. So get inspired here : http://pinterest.com/tania_dunkley/crafty-knit-and-crochet/
These are a couple of my favourites
(click on the pictures to see the original publisher)

Now for the links to the lessons / videos etc:
This one has the basic steps, in 5 lessons:
This one is an online (free) book that shows you loads of stuff :
And another Crochet School here :
http://www.craftyminx.com/2011/11/crochet-school-.html/
And a FREE 220page crochet E-book :
http://issuu.com/lesliss/docs/crochet-visual-quick-tips
And a FREE 220page crochet E-book :
http://issuu.com/lesliss/docs/crochet-visual-quick-tips
if you have any questions you know where to find me :)
have fun!!!
regards
Tania
bbm: 270c6236
You might also like:
from Craftty Stuff...few tutorials
|
Posted: 26 Apr 2012 12:53 AM PDT
A few tutorials on crocheting that i found that you might enjoy :
photo tutorial : How to crochet a granny circle Click here for the link http://purlbee.squarespace.com/granny-circle-placemats/ 
Photo Tutorial : How to crochet a granny square
click here http://purlbee.squarespace.com/granny-square-project/  I had a request for info on bead crochet and I found this cool website that gives loads of information. http://beadcrochet.com/and here are some simple starter patterns that you can do, like the bracelet in this picture http://crochet.about.com/library/weekly/aa030197.htm and more articles from Beading Daily herehttp://www.beadingdaily.com/topics/bead-crochet.aspx and a facebook page on bead crochet herehttps://www.facebook.com/pages/Bead-crochet/115383601808070  a lovely scrap material crochet "rag bag" also on Articrafti Blog See here how to make it. :http://petrow-articrafti.blogspot.com/2012/04/from-crochetcom-rag-bag.html?utm_source=feedburner&utm_medium=feed&utm_campaign=Feed%3A+Articrafti+%28articrafti%29  Great Step by step picture pattern for a stretchy headband on Ravelry. (you may have to sign up with them but its free) See the pattern here :http://www.ravelry.com/patterns/library/headband-pattern-the-genius-headband  |
|
Posted: 26 Apr 2012 12:42 AM PDT
Some great Recycle ideas that I have posted on Facebook... enjoy :)
Seen on pinterest.. gorgeous flower lampshades. You could do something similar by using a glue-gun to stick flowers to an old shade. pinned here http://pinterest.com/pin/173810866838978178/  ok I know I have said it before... Im a sucker for garden chimes! This is a cute one made from clay pots, and made with kids in mind.... see the tutorial herehttp://blog.hgtv.com/design/2012/03/06/hgtv-how-to-create-a-colorful-kid-friendly-wind-chime/ 
Make a kitchen sponge holder from a shampoo bottle. Great recycle idea. See the tutorial herehttp://craftingagreenworld.com/2012/04/05/how-to-sponge-holder-from-a-shampoo-bottle/?utm_source=feedburner&utm_medium=feed&utm_campaign=Feed%3A+IM-craftingagreenworld+%28Crafting+a+Green+World%2
9 
Update an old whiskey bottle or similar pretty bottle. See the tutorial on Articrafti here http://petrow-articrafti.blogspot.com/2012/04/another-bottle-idea-from-turnstyle.html?utm_source=feedburner&utm_medium=feed&utm_campaign=Feed%3A+Articrafti+%28articrafti%29

Update old accessories with a little paint. Even give cheap market or sale items a new look... lovely as a gift.
See how to here : http://www.home-dzine.co.za/crafts/craft-2x.htm
a lovely scrap material crochet "rag bag" also on Articrafti Blog
See here how to make it. :http://petrow-articrafti.blogspot.com/2012/04/from-crochetcom-rag-bag.html?utm_source=feedburner&utm_medium=feed&utm_campaign=Feed%3A+Articrafti+%28articrafti%29
10 ways to refurnbish an old filing cabinet. Great for a home office, kitchen or bedroom!
See the blog ideas here http://blogs.babble.com/the-new-home-ec/2011/08/11/refurbish-a-filing-cabinet/  |
Tote bag find...follow the link a must do....
Tania Dunkley
Turn an ordinary canvas shopping bag into a pretty ruffled one! cute for shopping or a day out.

Turn an ordinary canvas shopping bag into a pretty ruffled one! cute for shopping or a day out.
Full (EASY) tutorial here http://www.susieharrisblog.com/2010/05/diy-almost-no-sew-ruffle-purse.html
http://www.craftystuff.co.za/ for handmade baby clothes and photoprops

Turn an ordinary canvas shopping bag into a pretty ruffled one! cute for shoppin...g or a day out.
Full (EASY) tutorial here http://www.susieharrisblog.com/2010/05/diy-almost-no-sew-ruffle-purse.html
http://www.craftystuff.co.za/ for handmade baby clothes and photopropsSee More
Full (EASY) tutorial here http://
http://www.craftystuff.co.za/ for handmade baby clothes and photopropsSee More
Wednesday, 25 April 2012
roses everywhere - new find on crochet
"Granny Rose Crochet-A-Long"
I am so very delighted and proud of all of you.
Everyone single one of you got these dead on:
Take a good look at Olga's roses from
"There Where is Soleil" blog.
She modified the pattern to make them more lush and I love it!
She has a knack for bringing on the sunshine!

Carole at Stardust Gems and Ribbon
has finished her magnificent cushion and plans to make more cushions.
Wishing you all a very happy weekend!
Take a good look at Olga's roses from
"There Where is Soleil" blog.
She modified the pattern to make them more lush and I love it!
She has a knack for bringing on the sunshine!

Carole at Stardust Gems and Ribbon
has finished her magnificent cushion and plans to make more cushions.
Posted: 20 Apr 2012 03:00 AM PDT
Visit Apple Blossom Dreams for a step-by-step tutorial on how to make a pretty granny rose pillow.
Links below...
Tuesday, 24 April 2012
another bottle idea from turnstyle vogue
DIY: Glass Bottle Makeover
Good morning everyone.
Today I just wanted to show you a little bottle makeover I did earlier this week – just for fun.
I save cool bottles just in case I get a crazy idea and throughout football season and the holidays, I acquired quite a few (Bottles, that is. Not crazy ideas.)
Yes…many of my bottles are courtesy of Crown Royal, Pendleton, Cabana Bay, and local vineyards. Although I rarely consume, I love the packaging! Sort of like picking a favorite football team because of their uniforms – which I certainly DO NOT do!
Anyhow, in the past, I’ve wrapped jute around them, embellished them, sprayed them with chalkboard paint, and so on.. but this time I wanted to do some vintage glam – something you might find at Pottery Barn.


Although I removed the label from the top, the wording on this bottle is actually raised lettering that could not be removed. However, sanding the bottle worked perfectly.
After I cleaned it up, I sprayed it with a metallic bronze spray paint.

I then started to work away with ASCP in Provence. This shows the first coat but I ended up doing two coats.

I then got my 80 sanding block and started distressing the raised areas, sanding down to only the metallic paint in some areas and all the way down to the glass in others.


I used dark wax to create a light patina.
I chose to leave the lid metallic, but with the same distressing.


I can see a really cool monogram or stencil right in the middle, can’t you? My daughter really likes this color so she will be taking this home with her. I’ll let the new owner decide about a stenciled embellishment.
Today I just wanted to show you a little bottle makeover I did earlier this week – just for fun.
I save cool bottles just in case I get a crazy idea and throughout football season and the holidays, I acquired quite a few
Yes…many of my bottles are courtesy of Crown Royal, Pendleton, Cabana Bay, and local vineyards. Although I rarely consume, I love the packaging! Sort of like picking a favorite football team because of their uniforms – which I certainly DO NOT do!
Anyhow, in the past, I’ve wrapped jute around them, embellished them, sprayed them with chalkboard paint, and so on.. but this time I wanted to do some vintage glam – something you might find at Pottery Barn.


Although I removed the label from the top, the wording on this bottle is actually raised lettering that could not be removed. However, sanding the bottle worked perfectly.
After I cleaned it up, I sprayed it with a metallic bronze spray paint.

I then started to work away with ASCP in Provence. This shows the first coat but I ended up doing two coats.

I then got my 80 sanding block and started distressing the raised areas, sanding down to only the metallic paint in some areas and all the way down to the glass in others.


I used dark wax to create a light patina.
I chose to leave the lid metallic, but with the same distressing.


I can see a really cool monogram or stencil right in the middle, can’t you? My daughter really likes this color so she will be taking this home with her. I’ll let the new owner decide about a stenciled embellishment.
from crochet.com a rag bag
anatomy of a rag bag
Want to see how the easy peasy crochet bag works up in rags???

I've cut my fabric into half inch strips using this method, and used an 8mm crochet hook. Because the fabric does not 'give' in the same way which yarns do, there is a tendency to work with too much tension... which results in painful wrists. My recommendation is that you focus on keeping your tension loose. Relax your grip. Perhaps even change your technique a little. For example, I would usually grip the hook in a 'pen-like' manner... but when working with rags I switch to a 'knife-like' grip. You just need to experiment a little to find what works for you.
This will be a multi-coloured bag, to use up some of my oddments of rags. When changing colours you can use this method to join in the next 'yarn'.
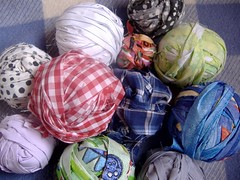
I'm starting with this assortment of rags. I have 10 different prints here.
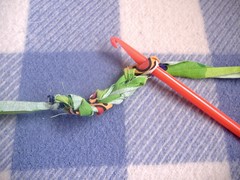
Here's the 5 starting chain, plus a turning chain for luck!
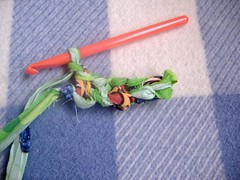
Now the 5 sc... and another turning chain
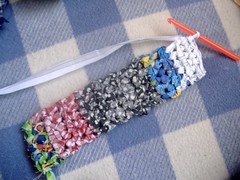
20 rows of sc and the base is complete
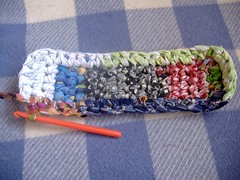
Starting round of sc along the sides of the rectangle

Keep spiralling around in sc.
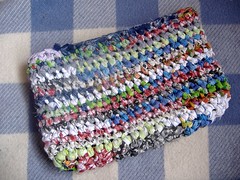
15 rounds of sc and the body is complete
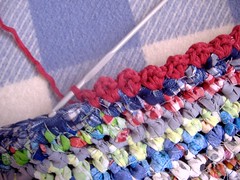
Time to choose a colour for the trim. I like to pick one of the colours in the bag to accentuate. In this case I would choose either the green, blue or red. The green will be too gaudy for my taste... a little in the bag is fine, but I don't want to make it more of a feature. Blue is not a bad choice, but a bit too subdued. I'm liking the red.

Picot trim in red using a 4.0mm hook and thick cotton.
Choosing a colour for the handles. Nothing too bright, I'm going to go with navy.

3 starting chain, plus a turning chain for luck...
3sc plus another turning chain... repeat until desired length
then make another exactly the same
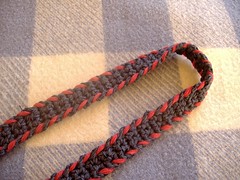
Add some colour.
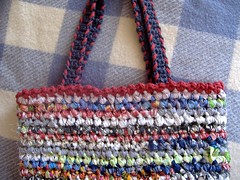
Attach handles to bag.
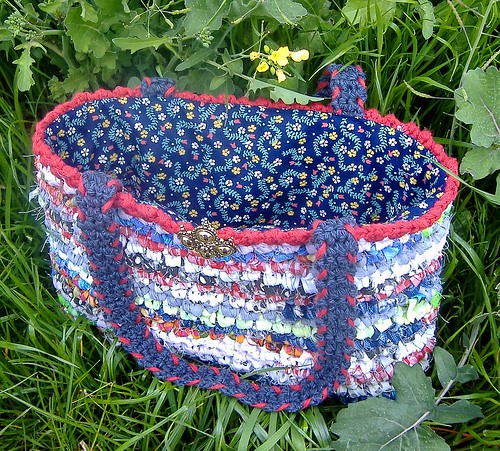
Pop in the lining... tutorial here
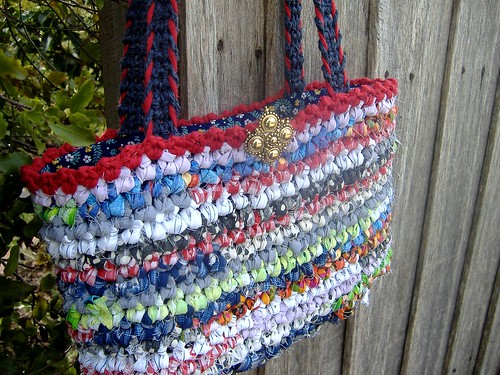
I've added an old clip-on earring as a removable embellishment, and the job is done!

I've cut my fabric into half inch strips using this method, and used an 8mm crochet hook. Because the fabric does not 'give' in the same way which yarns do, there is a tendency to work with too much tension... which results in painful wrists. My recommendation is that you focus on keeping your tension loose. Relax your grip. Perhaps even change your technique a little. For example, I would usually grip the hook in a 'pen-like' manner... but when working with rags I switch to a 'knife-like' grip. You just need to experiment a little to find what works for you.
This will be a multi-coloured bag, to use up some of my oddments of rags. When changing colours you can use this method to join in the next 'yarn'.

I'm starting with this assortment of rags. I have 10 different prints here.

Here's the 5 starting chain, plus a turning chain for luck!

Now the 5 sc... and another turning chain

20 rows of sc and the base is complete

Starting round of sc along the sides of the rectangle

Keep spiralling around in sc.

15 rounds of sc and the body is complete

Time to choose a colour for the trim. I like to pick one of the colours in the bag to accentuate. In this case I would choose either the green, blue or red. The green will be too gaudy for my taste... a little in the bag is fine, but I don't want to make it more of a feature. Blue is not a bad choice, but a bit too subdued. I'm liking the red.

Picot trim in red using a 4.0mm hook and thick cotton.
Choosing a colour for the handles. Nothing too bright, I'm going to go with navy.

3 starting chain, plus a turning chain for luck...
3sc plus another turning chain... repeat until desired length
then make another exactly the same

Add some colour.

Attach handles to bag.

Pop in the lining... tutorial here

I've added an old clip-on earring as a removable embellishment, and the job is done!
Subscribe to:
Comments (Atom)

